|
 |
|
|
||||
Write Payroll Command |
|||||
|
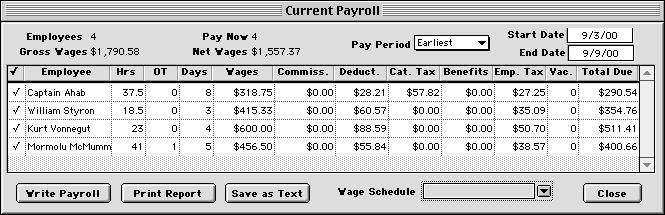
This section explains how to use the Write Payroll command to calculate deductions, set up employee payroll and write paychecks. HINT-- The Write Payroll command is an important part of the Goldenseal payroll software. WRITE PAYROLL BASICS WRITE PAYROLL COMMAND PAYROLL DETAILS WEBSITE INFO LINKS RELATED TOPICS After you have entered Labor Hours records into the Goldenseal payroll software, follow these steps to prepare payroll from them:
To write paychecks, follow these steps:
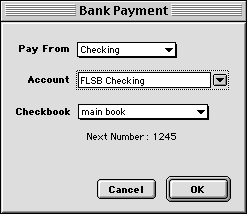
HINT-- You can leave the Account field blank, if you don't want to create paychecks immediately The Goldenseal software starts out with the earliest pay period that includes unpaid labor hours. Use the Pay Period popup menu to change to a different pay period. You can enter the current pay period, any of the three previous periods, or the next pay period. You can also view all labor hours, or you can enter a custom range. After you change to a different pay period, Goldenseal automatically adjusts the Start Date and End Date fields and fills in the appropriate labor hours. The Goldenseal payroll software starts by including all employee hours in the payroll report, even if you used more than one wage schedule. NOTE-- If you use more than one pay interval (for example, weekly and biweekly), you'll only see labor for one payroll interval at a time. To see the work done under just one wage schedule, enter a wage schedule into the Wage Schedule field. The Wage Schedule field is useful if you have a mixture of salaried and hourly employees, or if you write separate paychecks for different types of work. To write payroll for just one wage schedule, follow these steps:
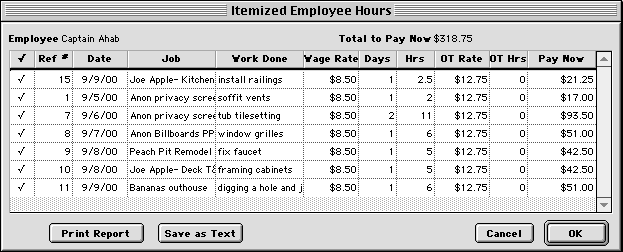
To see an itemized list of the hours worked, double-click in the employee's
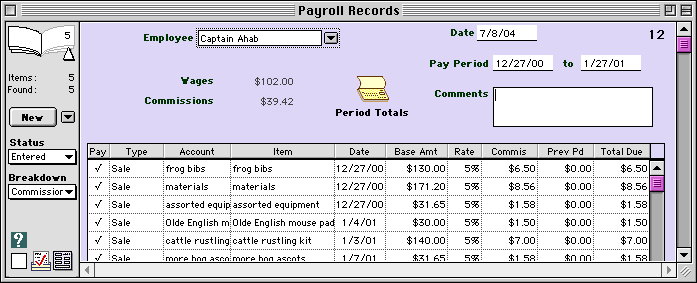
row on the Hours column. You can adjust the overtime hours if they are not correct. You can also decide not to include some hours in this pay period-- simply turn off the check mark in the far left column. When you have finished adjusting hours, click OK. To see an itemized list of the commissions earned by an employee, double-click
in the employee's row on the Commissions column. You can also decide not to include some commissions in this pay period-- simply turn off the check mark in the far left column. When you have finished adjusting commissions, click OK. To see a list of tax deductions, double-click in the employee's row on
the Deduction column. If there are some deductions that should not be included, turn of the checkmark in the first column. HINT-- If you see X's in the first column, then you can't adjust the deductions here. You'll need to assign a new Tax Package to the employee instead, or turn on the editable status for payroll in Expense Preferences. When you have finished checking deductions, click OK. HINT-- Normally you cannot change deduction amounts. If you'd like to be able to, choose Preferences from the Options menu, choose Expenses from the submenu, and turn on the Allow Payroll Deduction Changes checkbox. To see a list of employer taxes, double-click in the employee's row on
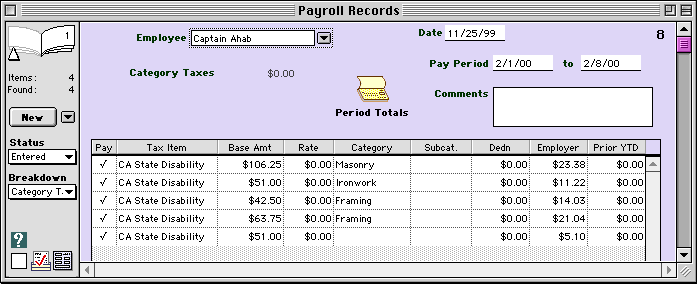
the Employer Tax column. You'll see a list of employer tax items, with the amount for each. If there are some deductions that should not be included, turn of the checkmark in the first column. HINT-- If you see X's in the first column, then you can't adjust the deductions here. You'll need to assign a new Tax Package to the employee instead, or turn on the editable status for payroll in Expense Preferences. When you have finished checking deductions, click OK. HINT-- Normally you cannot change deduction amounts. If you'd like to be able to, choose Preferences from the Options menu, choose Expenses from the submenu, and turn on the Allow Payroll Deduction Changes checkbox. The Goldenseal payroll accounting software calculates some taxes based on the category of work entered in the Labor Hours records. For example, some states base worker's comp rates on the actual work done. To see a list of category taxes, double-click in the employee's
row on the Category Tax column. You'll see a list of category taxes and cost categories, with the amount of tax for each. If there are some deductions that should not be included, turn of the checkmark in the first column. HINT-- If you see X's in the first column, then you can't adjust the deductions here. You'll need to assign a new Tax Package to the employee instead, or turn on the editable status for payroll in Expense Preferences. When you have finished checking deductions, click OK. HINT-- Normally you cannot change deduction amounts. If you'd like to be able to, choose Preferences from the Options menu, choose Expenses from the submenu, and turn on the Allow Payroll Deduction Changes checkbox. To see a list of benefit deductions, double-click in the employee's row
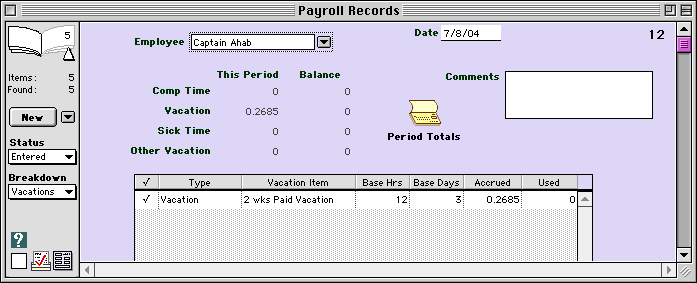
on the Benefits column. You'll see a list of benefits, with the amount for each. HINT-- Some benefits include a payment to the employee, some include a deduction from the employee, and some include an employer payment that goes to a tax or insurance agency. If there are some benefits that should not be included, turn of the checkmark in the first column. HINT-- If you see X's in the first column, then you can't adjust the benefits here. You'll need to assign a new Benefit Package to the employee, or allow payroll deductions to be changed in Expense Preferences. When you have finished checking benefits, click OK. To see a list of vacation items, double-click in the employee's row on
the Vacation column. You'll see a list of vacation items, with the amount for each. If there are some vacation items that should not be included, turn of the checkmark in the first column. HINT-- If you see X's in the first column, then you can't adjust the deductions here. You'll need to assign a new Vacation Package to the employee instead, or turn on the editable status for payroll in Expense Preferences. When you have finished checking benefits, click OK. When you pay one employee more than one wage rate during a pay period, enter Labor Hours records for all the work done by that employee, and change the Wage Schedule field so it has the proper rate for each piece of work. When you write payroll, you'll need to use the Write Payroll command once for each wage schedule. To do so, follow these steps:
In most tax districts, you need to base deductions on the actual amount worked in each payroll period, and then give advances (or subtract the repayment of advances) after that is calculated. To give an advance to an employee, follow these steps:
To include advances and advance repayments in with a cash payroll payment, follow the steps above but use a Cash Transaction and enter a Cash account. Goldenseal keeps track of the advances owed by each employee-- to see it, check the Advances Owed field in the Employee account records. Click here for more about payroll advances in Payroll Topics.
Main Page | Accounts | Lists | Transactions | Menus | Index | Website | User Page |