|
The Goldenseal project
billing software includes
specialized billing methods for projects This lesson covers
the following billing types:
- Draw Schedules-- For projects that use a fixed series of payments.
- Progress Payments-- For projects with payments based on the percentage
completion for different categories or locations.
- Time and Materials-- For projects with payments based on actual
costs.
- Allowances-- For allowances used in a project estimate.
- Change Orders-- For changes made in a project.
For project billing, the Billing
Record is the start of the billing process. It usually contains
a specialized breakdown which shows work completed and ready to bill.
Project Account Setup
In the Project account, use the Billing Type popup field to determine how you
will handle billing for this project. Six types of billing are available:
- Budget-- For internal projects for which you will never create bills.
- Draw Schedule-- For billing that uses a fixed series of completion
stages (see below). When you use this billing type, enter a specific
draw schedule into the Draw Schedule field.
- Time and Materials-- For billing based on actual costs, plus an
optional management fee (set in the payment terms).
- Progress by Category-- For billing based on percentage completion
for each cost category.
- Progress by Location-- For billing based on percentage completion
for each location in the project.
- Progress by Item-- For billing based on percentage completion for
each breakdown item in the project.
Project Payment Terms
Use Project
Payment Terms to set up basic billing
options for projects. To do so, follow these steps:
- Choose Payment Terms from the Options menu, then choose Projects from the submenu.
- You'll see a list of project payment terms. Click the New button.
- Enter a brief name for the terms, and any comments you have about it.
- If you'd like to print a longer description of payment terms onto bills, enter it into the Form Message
field.
- Enter the billing frequency, and the date that bills are due.
- If you give a grace period before you start charging interest, enter it.
- Enter any 'hold back' or retainage amount that is used for this type of project billing.
Retainage is not collected until the project has been completed.
- Enter any discounts you offer for early payments, and any charges you add for late payments.
- Enter the management fee(s) that you use for time and materials projects that use this set of payment
terms.
- Enter a starting date into the Base Date field at upper right. Goldenseal will automatically show you the
billing dates for this year.

Draw Schedules
To create a schedule of project draw payments, follow these steps:
- Choose Income Setup from the Income menu, then choose Draw
Schedules from
the submenu.
- You'll see a list of draw schedules. Click the New button.
- Enter payment information. You can charge a flat dollar amount as a deposit or final payment. The remaining
payments draws are each a percentage of the remaining project amount. NOTE: The table must add
up to 100%. Goldenseal will complain at you if it doesn't.
- When you are finished setting up the draw schedule, click OK.

To assign a draw schedule to a project, enter Draw Schedule into the Billing
Type popup menu, and enter the desired choice into the Draw Schedule field.
Draw Schedule Billing
Draw schedule bills are based on a fixed set of payments at different stages
of project completion. They apply to projects that have Draw Schedule as a project type.
To create a draw schedule bill, follow these steps:

- Choose Billing from the Bank menu, then choose Draw
Schedule from the submenu.
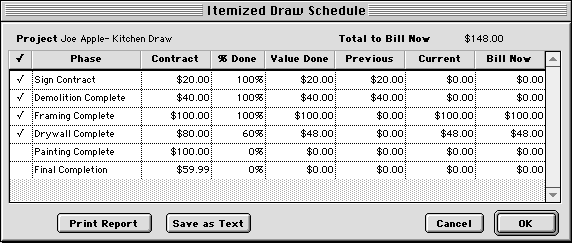
- You'll see a list of projects that use draw schedule billing, and the amount that is due from each (see
illustration on the top of the next page). Click in the first column to choose which projects to bill now.
- To see a detailed list of draw schedule steps, double-click anywhere in
a project's row.
- In the Phase column, you'll see a list of draw schedule milestones. HINT: To
set up a list of draw schedule milestones, choose Income Setup from the Income menu, then choose
Draw Schedules from the
submenu.
- If a milestone is completed, click on the check mark in the first column. If a milestone is partially completed,
enter either the percentage of completion, or the dollar amount that is ready for billing.
Goldenseal will add the amount to the Bill Now column.
- The Previous column shows items that were completed in a previous billing.
- When you are finished setting up the billing amount for a project, click the OK button.
- Repeat steps 3 to 7 for each project that is ready to bill now.
- To create bills, click the Create Bills button. Goldenseal will automatically create billing records.
Progress Payment Billing
Progress payment bills use the percentage of completion in each of the cost
categories, locations or cost items in a project.
To create a progress payment bill, follow these steps:
- Choose Billing from the Bank menu, then choose Progress
Payment from the submenu.
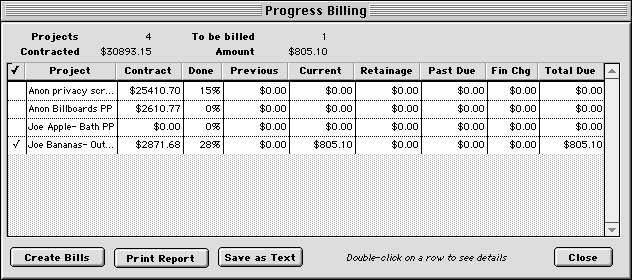
- You'll see a 'quick report' list of projects that use progress
payment billing, and the amount that is due from each. Click in the first
column to determine which projects to bill.
- To set the amount to bill for a project, double-click anywhere in its row.
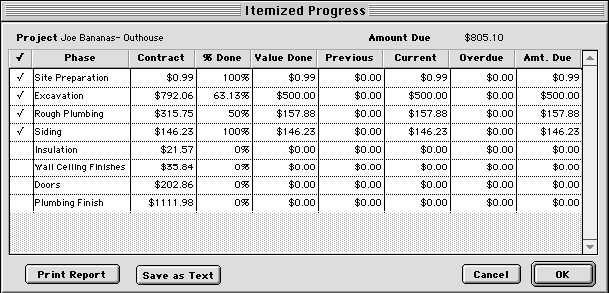
- You'll see a list of cost categories, locations or cost items, and
the percentage of each step that has already been completed. HINT: To set up the list of
categories or locations in the project, open the Project account and change the Category System or Location
Package field.
- Click in the first column to bill for a category that has been partially
or completely finished. HINT: If you will only bill for part of the item, you can adjust
either the percentage completed or the amount due.
- When you are finished setting up the billing amount for a project, click the OK button.
- Repeat steps 3 to 6 for each project that is ready to bill now.
- 8To create bills, click the Create Bills button. Goldenseal will automatically create billing records.
Time and Materials Billing
Time and materials bills use the actual cost of work to calculate billing amounts.
You can cover overhead and profit with a 'management fee', or with markup and billing rates that
are higher than actual costs.
To create time and materials bills, follow these steps:

- Enter expenses for the project-- use material purchases, equipment hours, and other expense transactions
(see Lessons 33 to 35).
- Choose Billing from the Bank menu, then choose Time
and Materials from the submenu.
- You'll see a 'quick report' list of projects that use time
and materials billing, and the amount that is due from each. Click in
the first column to determine which projects to bill now.
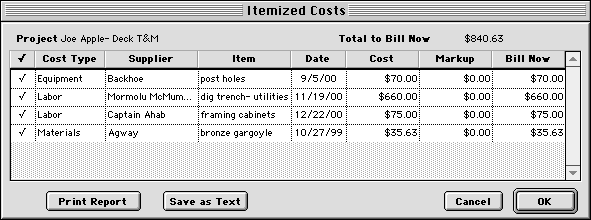
- To see detailed costs for a project, double-click anywhere in its row.
- You'll see a list of expenses.
- Click in the first column to change the billing status of any item.
- When you are finished checking expenses for a project, click OK.
- To create bills, click the Create Bills button. Goldenseal will automatically create billing records.
Billing Rates
Use billing rates to set the amount to bill for equipment, labor and subcontractor
hours that apply to a time-and-materials project. Billing rates are also used to calculate job costs.
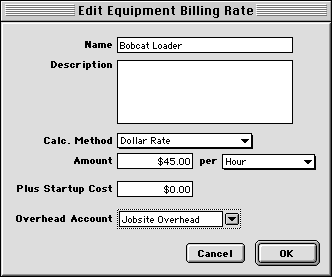
To create billing rates for equipment, follow these steps:
- Choose Billing Rates from the Options menu, then choose Equipment from the
submenu.
- Click the New button to create a new billing rate.
- Enter information about the rate.
To set the billing rate for an equipment account, follow these steps:
- Choose Equipment from the Accounts menu.
- Find the account you'd like to change.
- Enter a billing into the Billing Rate field.
When you create an equipment hours, labor hours or subcontractor cost record,
Goldenseal automatically enters the usual billing rate for that account. Enter a new rate into
the T & M
Billing Rate field if it is different for this record.
Allowance Billing
Use allowance billing for items in a project estimate that are handled as an
allowance (see Lesson 6). The original allowance budget amount is already included in the regular project
billing amount, so allowance billing covers the difference between the original estimate and actual costs.
NOTE: If costs are less than the original allowances, the billing
amount is negative. In that case it will be a credit against the main project cost.
To create bills for Allowances, follow these
steps:

- Choose Billing from the Bank menu, then choose Allowances from the submenu. You'll see a list of active
projects that have allowances.
- To bill for the allowances on a project, double-click on its row.
- You'll see a list of allowances for the project, along with details for the costs to date. To bill for
an item now, click in the far left row. To see a list of specific costs for an allowance,
double-click in its row.
- When you are finished marking allowances for a project, click OK.
- To create bills, click the Create Bills button. Goldenseal will automatically create billing records.

Change Order Billing
Use change order billing for changes in a project.
Each Change
Order is a 'mini-estimate'
for extra work. Change orders can be for a simple fixed amount,
or they can be calculated as time-and-materials.
To create bills for change orders, follow these steps:
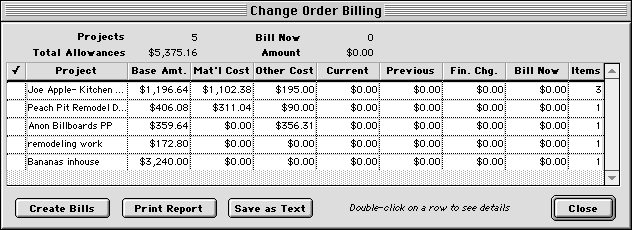
- Choose Billing from the Bank menu, then choose Change
Orders from the submenu. You'll see a list of all
active projects with change orders.
- To bill for the change orders on a project, double-click on its row.
- You'll see a list of change orders for the project, along with details
for the costs to date. To bill for an item now, click in the far left row. To
see a list of costs for a change order, double-click in its row.
- When you are finished marking change orders, click OK.
- To create bills, click the Create Bills button. Goldenseal will automatically
create billing records.

Retainage
Goldenseal makes it easy to handle retainage-- an amount that is 'held
back' until a project is completed.
Charging Retainage
To start using retainage for a project, follow these steps:
- Choose Payment Terms from the Options menu, then choose Projects from the
submenu.
- Open an existing payment term, or click the New button.
- Enter the retainage amount into the Retainage fields (see page 306).
- Enter other information about the project payment terms.
- Click OK.
- Choose Projects from the Accounts menu.
- Find the project.
- Enter the payment terms which contain retainage into the Payment Terms field.
Deducting Retainage
When you create each Billing Record, the retainage amount is automatically
deducted.
Billing for Final Retainage Amount When you are finished with a project, follow these steps to bill for the retainage
balance:
- Do a final billing for the project. For a draw schedule or progress payment
project, make sure all items have been 100% billed. For a time and materials
project, make sure that all costs have been billed.
- Choose Billing Records from the Bank menu.
- Click the New button.
- Enter Projects into the Account Type popup menu.
- Enter the project into the Account field.
- Enter Retainage Balance into the Billed Item popup menu. The current balance
of retainage is automatically entered into the Gross Price.
Finance Charges
When you use the Billing command, Goldenseal automatically computes finance charges based on the unpaid balance
from the project, and the charges included in the project payment terms. Finance
charges are shown in the Finance Charges field in the Billing Record.
You can also type in a finance charge amount.
To bill for finance charges manually, follow these steps:
- Choose Billing Records from the Bank menu.
- Click the New button.
- Enter the account type and account being billed.
- Enter Finance Charge into the Billed Item popup menu.
- Enter the amount of the charge into the Gross Amount field.
Finishing Up
In this lesson you have learned how to use the Goldenseal accounts receivable software to
do billing for projects.
You might want to practice this lesson by creating some invoices to send to
people you know. Now is your chance to convert all the favors you have done over the years into cold hard
cash!
Don't worry about what you put into the bills. Most people will pay them
without looking at the details, so long as you've developed a good-looking logo (see Lesson 18).
HINT: If your logo is not attractive enough to inspire people
to pay you spontaneously, Billing Records can also be used for bribes, kickbacks, extortion and blackmail.
ANOTHER HINT: In that case you might want to add 'unmarked
bills' as a payment method. To do so, choose Income Setup from the Income menu, then choose Payment
Methods from the submenu.
STILL ANOTHER HINT: When record-keeping for illegal activities,
it's a good idea to use euphemisms. For example, you can use 'pansies' instead of 'hush
money, 'petunias' instead of 'bribes', and 'chrysanthemums' instead of 'assassinating
business rival'. For a complete guide to sleazy business euphemisms, see Appendix C.
YET ANOTHER HINT: If you are a florist, you may be falsely accused
of illegal activities because of the previous hint. For a list of acceptable substitutes for common flower
species, see Appendix D.
Start | Previous | Next | Directory | Index | Ref
Manual | Website
|


