|
 |
|
|
||||
Lesson 37-- Bank Checks |
|||||
|
In this lesson you will learn how to use the checking transaction window in Goldenseal construction accounting software. It also explains how to enter bank checks, and how to print them. NOTE: See Lesson 31 for bank accounts, Lesson 38 for bank payments and transfers, and Lesson 44 for deposits. Checking transactions are very similar to the expense transactions shown in earlier lessons. To see checking transactions, follow these steps:
There are two ways to view bank transactions-- one account at a time, or all at once. To view transactions for just one checking account, click on the Checking Transactions menu, then choose a checking account from the submenu. NOTE: You can only have one Checking Transaction window open at a time. If you already have a window open for Checking Transactions, Goldenseal will close it when you open the window for a different account. To view all checking transactions at once, click on the Checking Transactions menu, then choose All Accounts from the bottom of the submenu. You'll see all checking transactions for all checking accounts. The bank account field is at the top of the window, immediately to the right of the browse controls. When you are viewing transactions for just one bank account, the bank account is always the same, and you can't change it. New transactions will always use the same account. HINT: To see details about the bank account, choose Main Account from the View menu, or double-click on the account name. When you view all accounts in one window, you can enter any bank account for new records. NOTE: The Goldenseal accounting software does not allow you to change the bank account for previous transactions. When you create a new bank transaction, choose the transaction type from the Type popup menu at top center. When you change the transaction type, the fields in the main window will also change. NOTE: Goldenseal only lets you change the transaction type for the most recent transaction. You can enter any of five different transaction types. Use the following transaction types for payments that go out of a bank account:
Use the Reconcile field to match your computer records against the bank statement, to make sure your balance is correct. Each bank transaction shows a running total for the bank account-- which it calculates from the account starting balance, adjusted by the current transaction and all previous transactions. If the running total is positive, it means you have money in the account. If it is negative, it means the bank is storing negative currency for you. HINT: Negative currency is red, not green, and it has pictures of bad former presidents instead of good ones. To see the current balance, scroll to the last Bank Transaction record, or check the Current Balance field in the bank account. Of course your actual bank balance may be different, since transactions usually don't clear in the same order as they are entered. You will probably enter most checks with the Pay Bills command (see Lesson 36) and the Write Payroll command (see Lesson 46). They are an easy way to enter many checks at once for your vendors and employees. You can also enter checks one at a time-- especially if you have already written the paper check before entering it into Goldenseal. When you enter checks directly into Goldenseal, you need to 'account for' the payment. Usually you do that by referencing one or more expense transactions. The following sections explain how to enter checks for specific situations. Paying For One Expense Transaction To write a check for one unpaid expense transaction, follow these steps:
Goldenseal automatically enters the correct amount to cover this transaction. When you complete the bank check, it marks the original expense transaction as paid.
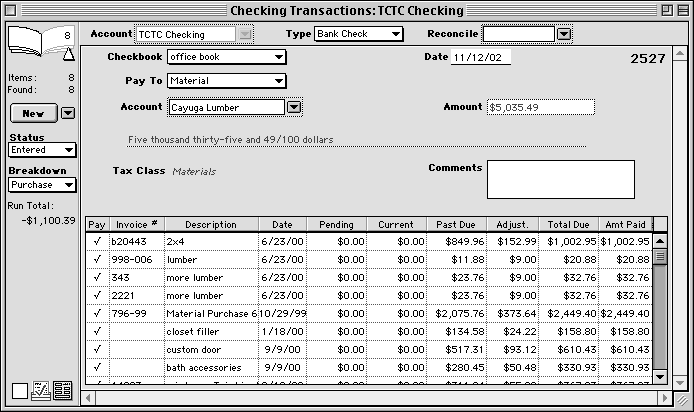
HINT: To see the transaction that this payment covers, choose Detail Transaction from the View menu. Paying For Several Expense Transactions The easiest way to pay for expenses is to use the Pay Bills command. You can also enter expense payments directly into a checking transaction, if you prefer that approach. To write a check to pay for several unpaid expense transactions from the same vendor, follow these steps:
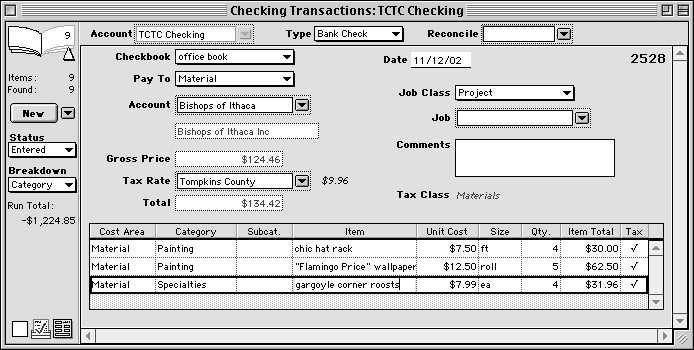
HINT: To see a transaction listed in the breakdown table, double-click on any non-editable cell in the transaction's row. Although we don't recommend it, The Goldenseal accounting software allows you to make purchases directly from a bank transaction. Direct purchases appear in job costs the same as regular expenses. To enter a direct purchase, follow these steps:
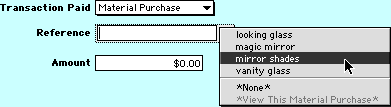
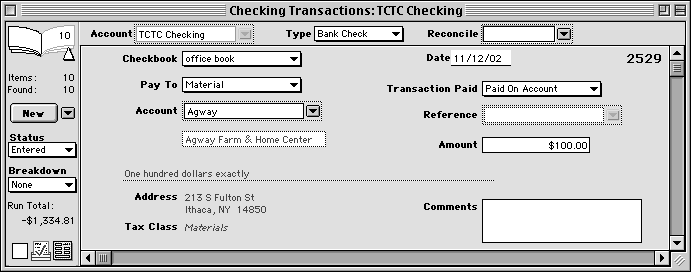
Should you Use Direct Bank Purchases? Purchases entered directly into a bank transaction can be difficult to find later, especially if you don't remember how you paid for the item. So it's usually better to not use direct purchases. To forbid direct payment of expenses from a bank account, choose Preferences from the Options menu, then choose Expenses from the submenu. Turn off the Allow Direct Bank Purchases option. HINT: When you enter expenses and pay by cash, check or credit card, Goldenseal creates an instant purchase bank transaction to handle the payment. It's just as easy as a direct purchase, and easier to find later. The Goldenseal accounting software allows you to make a payment 'on account' without applying it to a specific transaction. It subtracts the 'on account' balance from the amount owed for purchases, the next time you use the Pay Bills command. HINT: It is not hard to identify specific bills when you make payments (see pages 265 to 266), so the only time you need to pay on account is when you make a payment before purchases are entered. To pay a vendor 'on account', follow these steps:
Writing Checks to Other Bank Accounts To write a check that transfers funds to another of your bank accounts (including Cash accounts), follow these steps:
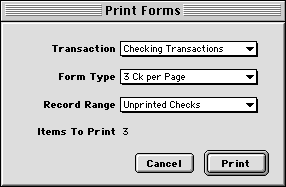
HINT: To pay bank service charges, or to transfer funds in any way other than by check, use a Transfer Out transaction (see Lesson 38). When you transfer money between two bank accounts, the transaction will be considered as an internal transfer-- it is neither an expense nor income. NOTE: If you write checks to pay for bank service charges, you will need to enter the bank as an Other Cost account, so you can create expense transactions for the bank charges. You do not need to do that if service charges are debited directly out of your account (the usual practice). To print checks onto pre-printed forms, follow these steps:
NOTE: There is more about the Print Forms command in Lesson 19. When you are viewing a paid expense, choose Payment Transaction from the View menu to see the bank transaction that made the payment. When you are viewing a bank check or bank payment that pays for one expense, choose Details Transaction from the View menu to see the item that was paid. When you are viewing a bank check or bank payment that includes a breakdown of several transactions, double-click in any non-editable cell in a transaction's row to see that transaction. Bank Reports / Checkbook Register To see a list of all checking transactions, choose Banking from the Reports menu, then choose Checking Transactions from the submenu. Other commands in the Banking menu show you other bank transactions. HINT: There is more about using business reports in Lesson 20. The Checking Transaction Report is like a checkbook register-- it shows one transaction per line, with just the most basic information. If you double-click on a checking transaction in the report, you'll see more details for that transaction. In this Lesson you have seen how to enter checks. Now that you are experienced with Goldenseal's check-writing features, why don't you have some fun writing sample checks to friends, technical writers, and charitable organizations such as tech writer support groups? Of course, if you don't want to actually send the checks, you can always use a stapler or duct tape to turn them into chic watermarked hats, just the right size for the smaller pets in your life. Start | Previous | Next | Directory | Index | Ref Manual | Website |